Getting Started
Dashboard overview
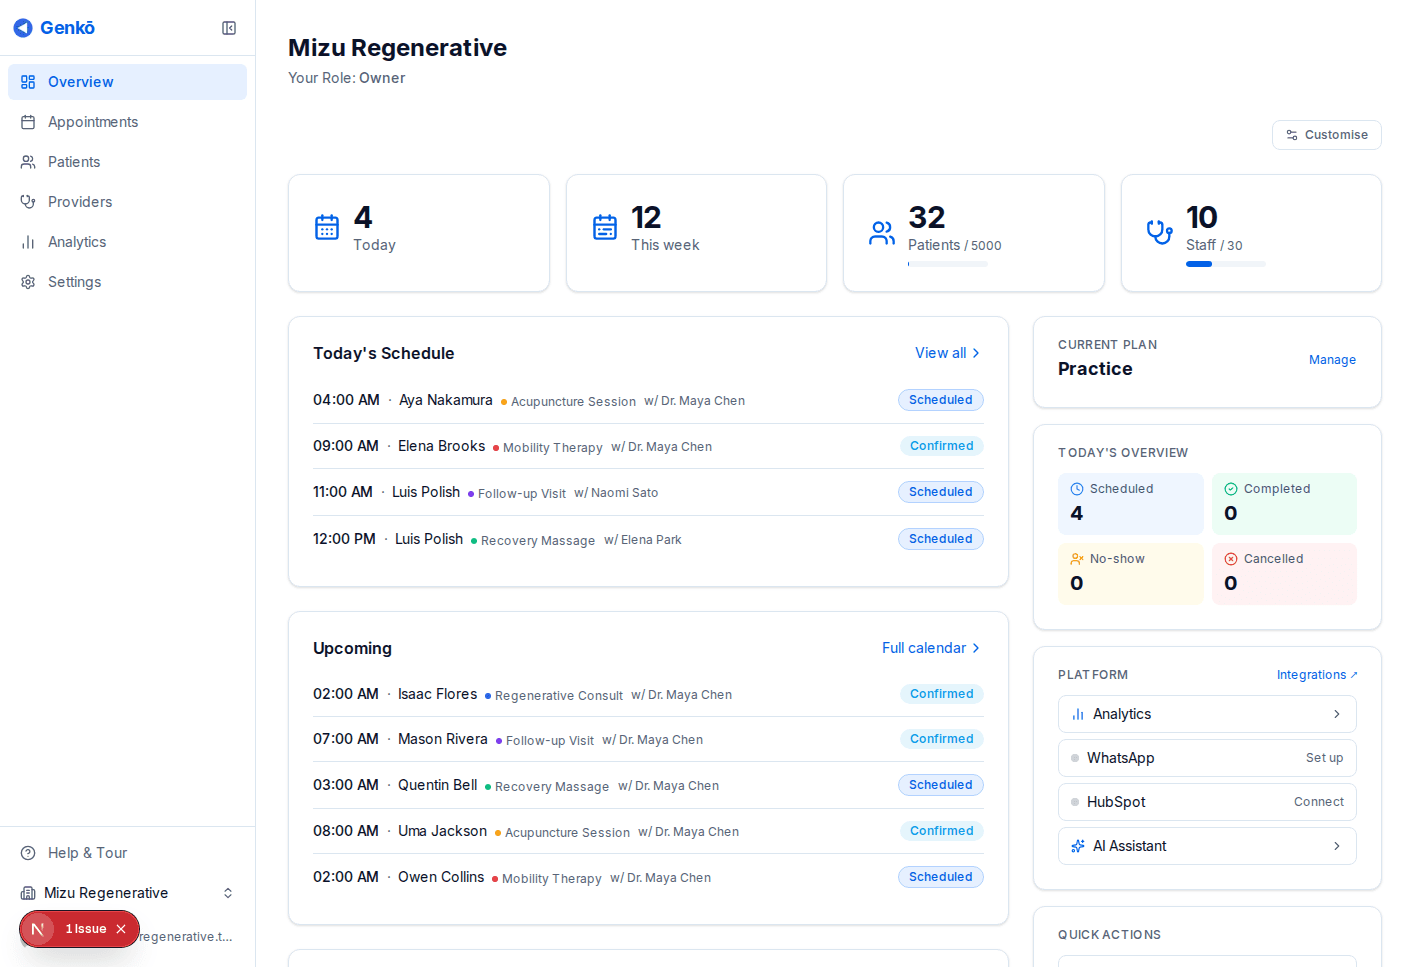
After signing up and completing the onboarding wizard, you land on your practice dashboard. The left sidebar gives you quick access to every section: Overview, Appointments, Patients, Providers, and Settings.
The Overview page is your mission control. It displays:
- Stats bar — today's appointments, this week's count, total patients, and staff — each with a usage indicator relative to your plan limits
- Today's schedule — a live list of appointments for the current day with patient name, time, type, provider, and status
- Upcoming — the next 5 appointments across the following 7 days
- Platform features (Group+ admins only) — live status indicators for Analytics, WhatsApp, HubSpot, and AI Assistant, with one-click links to configure each
- Quick actions — shortcuts to create appointments, add patients, manage providers, and navigate to Analytics
- Plan info — your current plan and subscription status
First steps checklist
New to Genkō? Work through these steps in order to get fully set up. Expect to spend 10–15 minutes:
- Add your services — Go to Settings → Services and create up to two appointment types. Examples: “Initial Consultation (60 min)”, “Follow-up (30 min)”, “Assessment (45 min)”.Services define duration and help patients understand what to expect. You can add more later.
- Add a provider — Go to Providers and either send an Invite Provider magic link or use Assign myself as Provider. Then click Edit Schedule to define their weekly availability.
- Add a patient — Go to Patients and click Add Patient. Full name is required; email and phone help with communication and reminders.
- Book your first appointment — Go to Appointments → New Appointment. Select the patient, provider, service, date, and time. Your first booking will help you understand the calendar.
- Enable the patient portal (optional) — Go to Settings → Portal to turn on self-service booking. You'll get a public link to share with patients.Next step after setup: Invite your team members via Settings → Members so they can help manage appointments.
Appointments
Booking an appointment
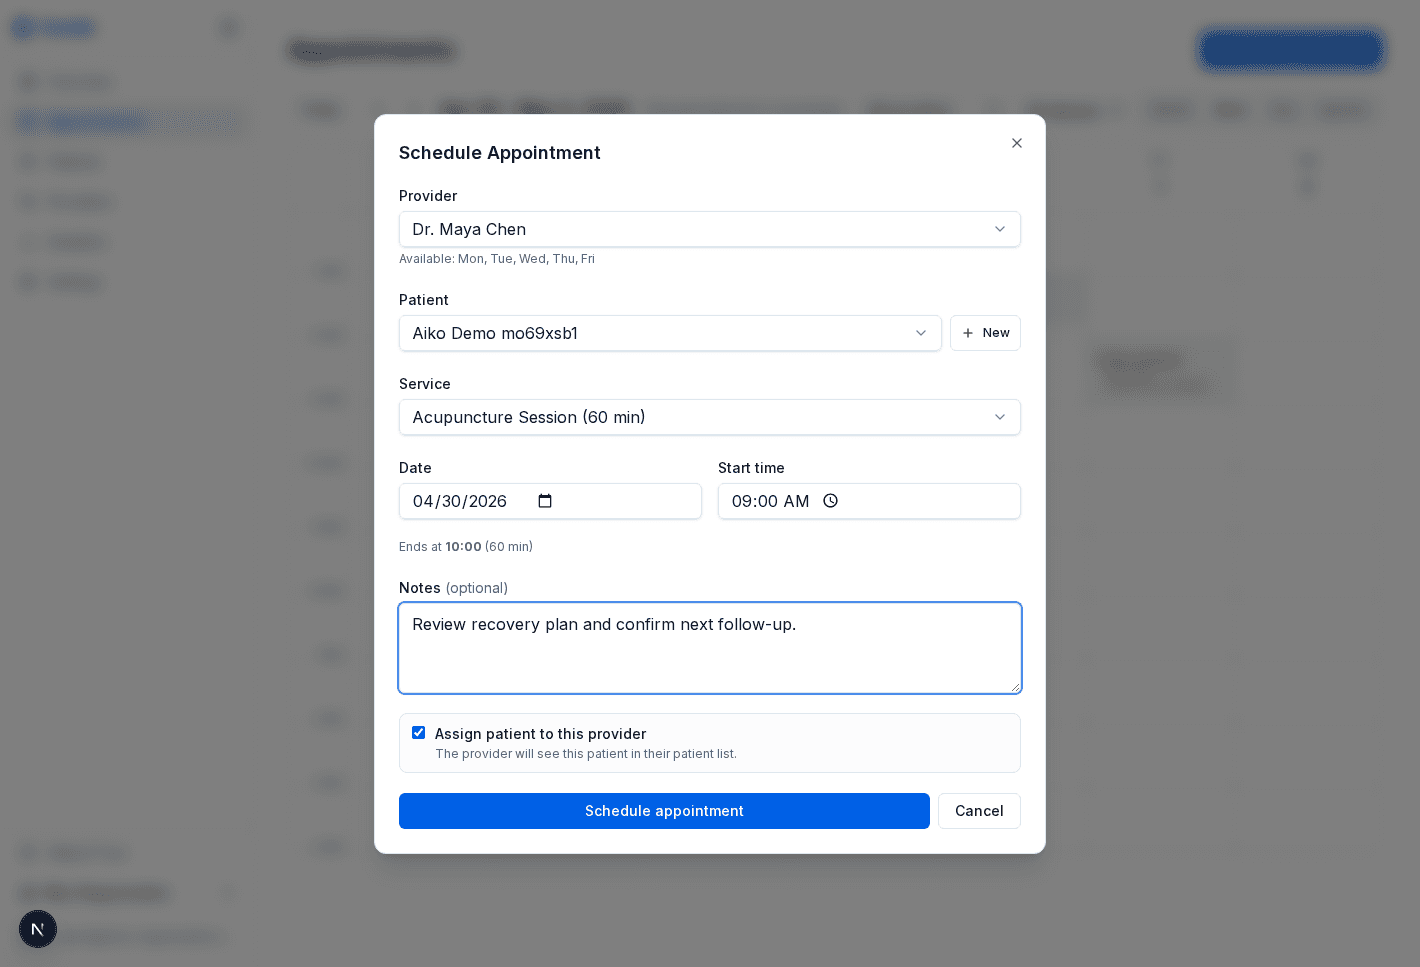
Click New Appointment at the top right of the Appointments page. A dialog opens where you fill in:
- Patient — search by name or email. If the patient doesn't exist, you can add them inline.
- Provider — only providers with availability on the chosen date are shown.
- Service — the appointment type, which determines the default duration (adjustable if needed).
- Date & Time — the date picker highlights days with available slots. Unavailable times are grayed out.
- Notes — internal notes visible to your team but not shown to the patient.
Once saved, the appointment appears on the calendar. Confirmation emails are sent automatically to the patient and provider (if email notifications are enabled in Settings).
Calendar views
Toggle between three views using the controls at the top of the Appointments page:
- Day view — focus on a single day, hour by hour. Ideal for detailed scheduling.
- Week view — see the full week at a glance. Best for spotting gaps and managing multiple providers.
- Month view — overview of the entire month. Good for long-term planning.
You can also filter by provider to focus on a single practitioner's schedule, or view all providers together. Your last view preference is remembered, so you return to the same view after navigating away.
Conflict detection
Genkō automatically prevents double-booking. The system checks every booking in real time:
- If you try to schedule a provider at a time they're already booked, you'll see an error and the slot will not save.
- Conflicts are checked on the server, so multiple staff members booking simultaneously are also safe—only one succeeds.
- The calendar grays out unavailable times, preventing mistakes before they happen.
Buffer minutes (available on Practice plan+) add a gap between appointments so providers have time to prepare, write notes, or take a break. For example, a 60-minute appointment with 10-minute buffer means the next slot can't start until 70 minutes later.
Appointment statuses
Every appointment moves through a lifecycle with four possible states:
- Scheduled — the appointment is confirmed and appears on the calendar. This is the initial state.
- Completed — mark this after the visit has taken place. Useful for tracking provider hours and practice productivity.
- Cancelled — the appointment was cancelled by staff or by the patient via the portal. The time slot is freed up for rebooking.
- No-show — the patient did not attend. This is separate from cancellation and helps track attendance patterns.
Staff, providers, and admins can update the status from the appointment detail view. Only owners and admins can delete appointments. Cancelled and no-show appointments don't block provider availability—the slot is immediately available for new bookings.
Patients
Adding patients
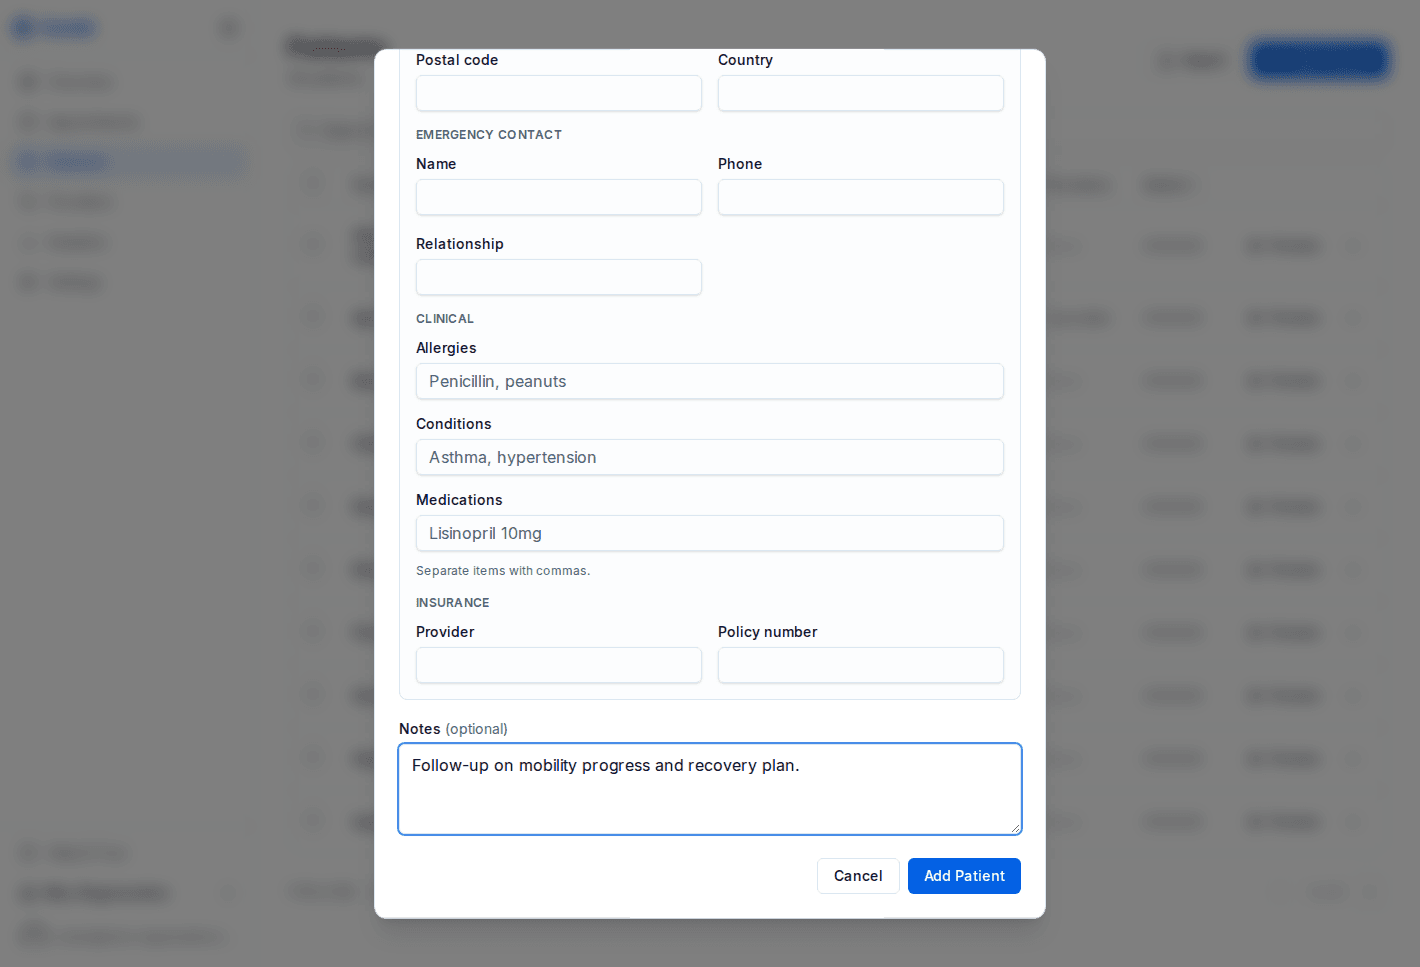
Go to Patients in the sidebar and click Add Patient. Fill in:
- Full name — required. Used to identify the patient everywhere in Genkō.
- Email — optional but recommended. Used to send appointment confirmations and reminders.
- Phone — optional. Helpful for quick follow-ups or confirmation calls.
- Date of Birth — optional. Useful for clinical context and age-related notes.
- Notes — optional. Add any relevant medical history, allergies, or preferences visible to your staff.
Patient records
Click a patient's name to open their detail page. Here you can:
- View and update contact information
- See full appointment history (past, upcoming, cancelled)
- Add or edit notes visible only to your team
- Check their usage against your plan limits
Permissions: Owners and admins can edit and delete patient records. Providers and staff have read-only access, protecting patient privacy.
Clinical notes Starter+
Providers and authorized staff can add structured clinical notes directly on any appointment. Four note types are supported:
- SOAP — structured Subjective / Objective / Assessment / Plan sections
- Progress — free-form narrative update
- Intake review — provider comments on a submitted intake form
- Discharge — end-of-visit summary
Notes are saved as drafts until published. Only owners and admins can edit or delete a published note. Clinical notes are never visible to patients via the portal.
Pre-visit intake forms Group+
When intake is enabled, patients receive a link to complete a pre-visit form before their appointment. The form collects:
- Reason for visit and chief complaint
- Symptom onset, description, and pain scale (0–10)
- Current medications, known allergies, and relevant conditions
- Confirmation of address, emergency contact, and insurance on file
Patients can save a draft and return later, or submit it in one session. Once submitted, the intake appears in the appointment view for your care team to review.
Intake review workflow (Practice+): On Practice plan and above, owners, admins, and providers can formally approve or reject a submitted intake and add review notes. The action is recorded in the audit log.
Longitudinal patient record Group+
The patient record page shows a full chronological timeline of every appointment, including the associated intake response and clinical notes for each visit. This gives your care team a continuous view of the patient's history without switching between appointments.
Plan limits
Each plan includes a patient limit. When you reach your plan's limit, you'll need to upgrade before adding more patients. Current usage is visible in Settings → Billing.
- Free — up to 100 patients
- Solo — up to 250 patients
- Starter — up to 500 patients
- Group — up to 1,000 patients
- Practice — up to 5,000 patients
- Enterprise — unlimited
Providers
Adding providers
There are two common ways to add providers:
- Invite Provider — send a magic-link invite from the Providers page when you're onboarding a teammate.
- Assign myself as Provider — owners can add themselves if they also see patients directly.
Invited providers join with the Provider role, then appear in your scheduling views as soon as they set their specialty and availability.

Setting availability
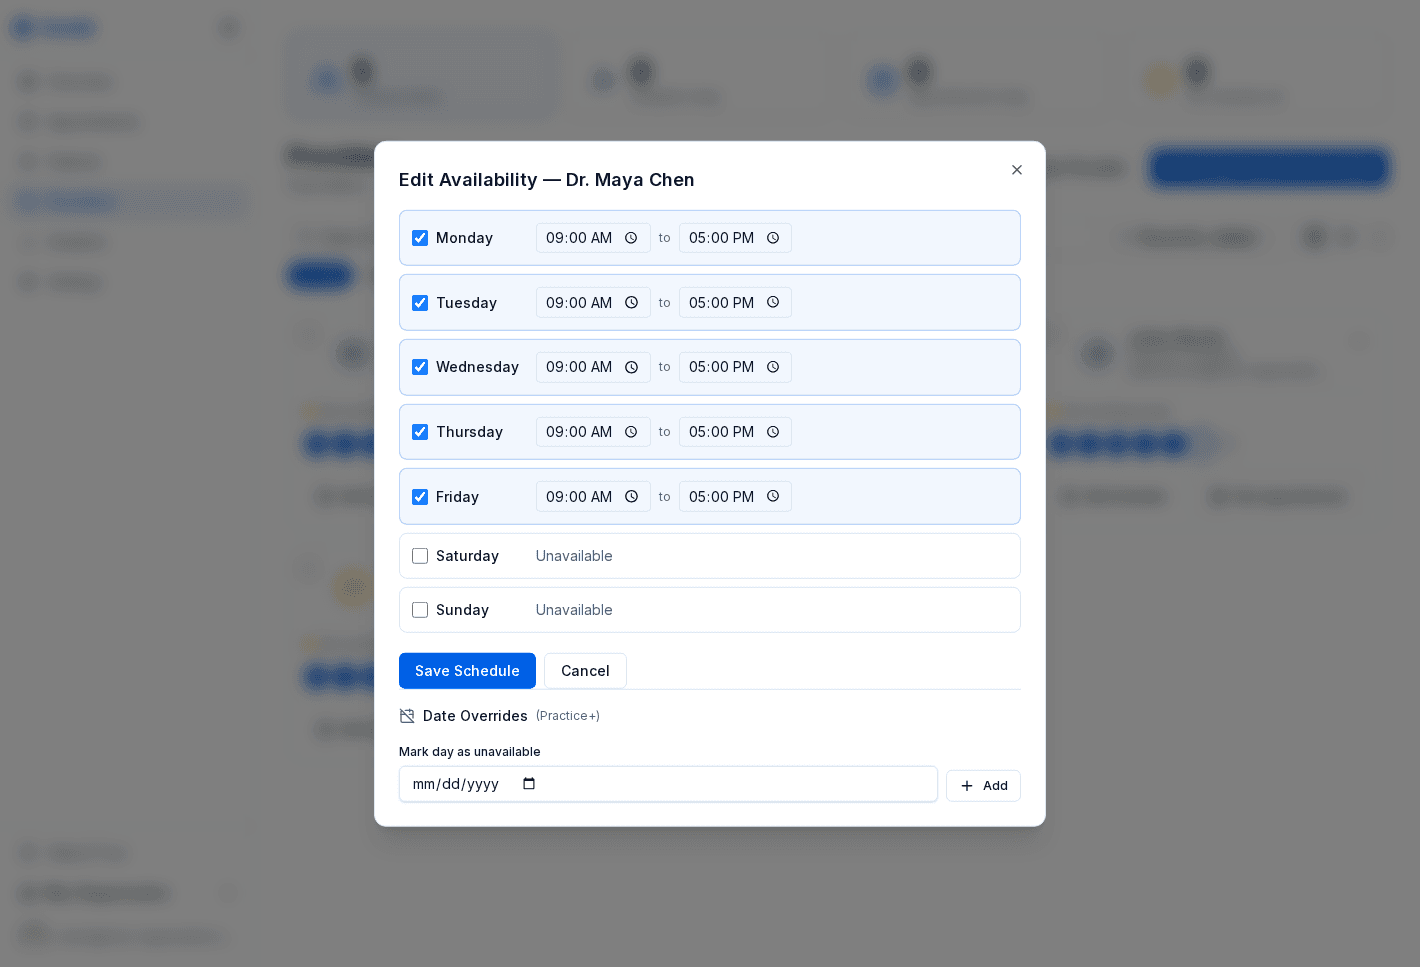
Open a provider card and click Edit Schedule to define their weekly availability. Genkō uses this to show only bookable slots when creating appointments or in the patient portal.
How it works:
- Set availability for each day of the week (Monday through Sunday)
- For each working day, specify start time and end time (e.g. "9:00 AM - 5:00 PM")
- Providers not working a day can be marked as unavailable
- The system blocks bookings outside these hours
Advanced scheduling rules
Practices on the Practice plan and above can configure fine-grained rules per provider to enforce your scheduling policies:
- Buffer minutes — adds a gap between consecutive appointments. Example: 60-min appointment + 10-min buffer = next slot starts 70 minutes later. Great for note-taking or prep time.
- Max appointments per day — caps the total number of bookings for a provider on any given day. Example: max 8 appointments prevents overbooking.
- Booking window — limits how far in advance patients can book. Example: “up to 60 days ahead” prevents far-future bookings. Useful for practices that want to keep scheduling flexible.
- Day-of-week restrictions — limit which days a provider is bookable via the patient portal (staff can still book them on restricted days). Useful for specialists who work limited hours.
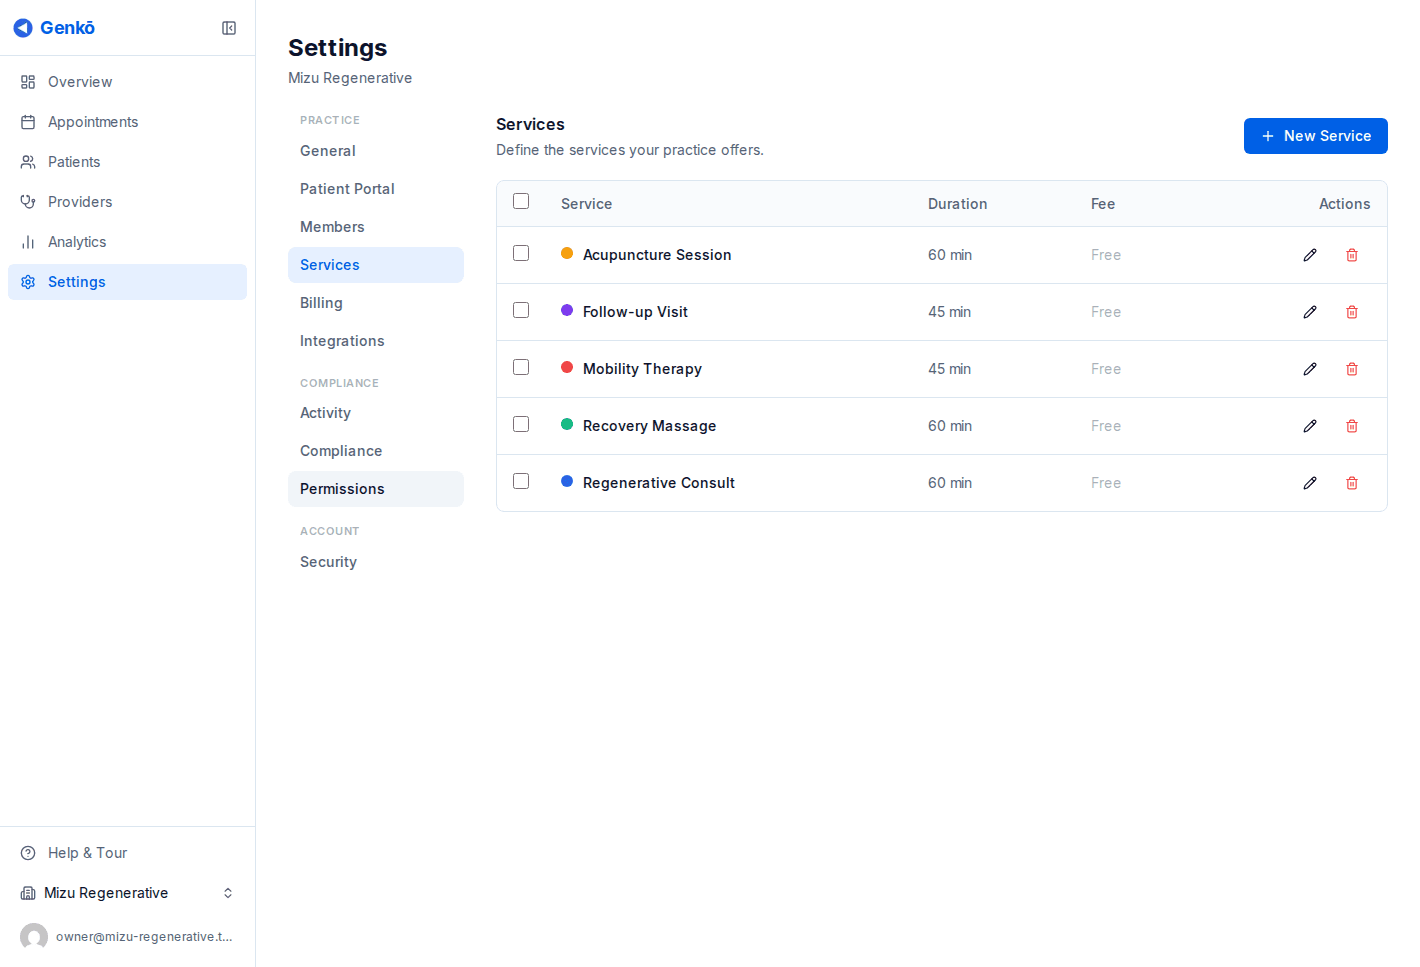
Services
Appointment types
Services (also called appointment types) define the kinds of visits your practice offers. Each service has:
- Name — the appointment type displayed to staff and patients (e.g. "Initial Consultation")
- Duration — default length in minutes. When you book an appointment with this service, the duration pre-fills (adjustable per booking if needed).
- Description — optional. Explains what the appointment includes. Shown to patients in the portal to set expectations.
Managing services
Go to Settings → Services to create, edit, or archive services. You can:
- Create new services — click Add Service and fill in name, duration, and optional description.
- Edit services — click the pencil icon next to any service to change its details.
- Archive services — hide old or unused services without deleting them. Archived services can't be booked but appear in historical records.
Permissions: Owners and admins can manage services; providers and staff have read-only access.
Plan details: Free includes up to two services. Solo and above unlock multiple services, optional appointment fees, Google Calendar sync, and Stripe-powered paid booking. Practice and above also add per-service buffer time.
Team Members
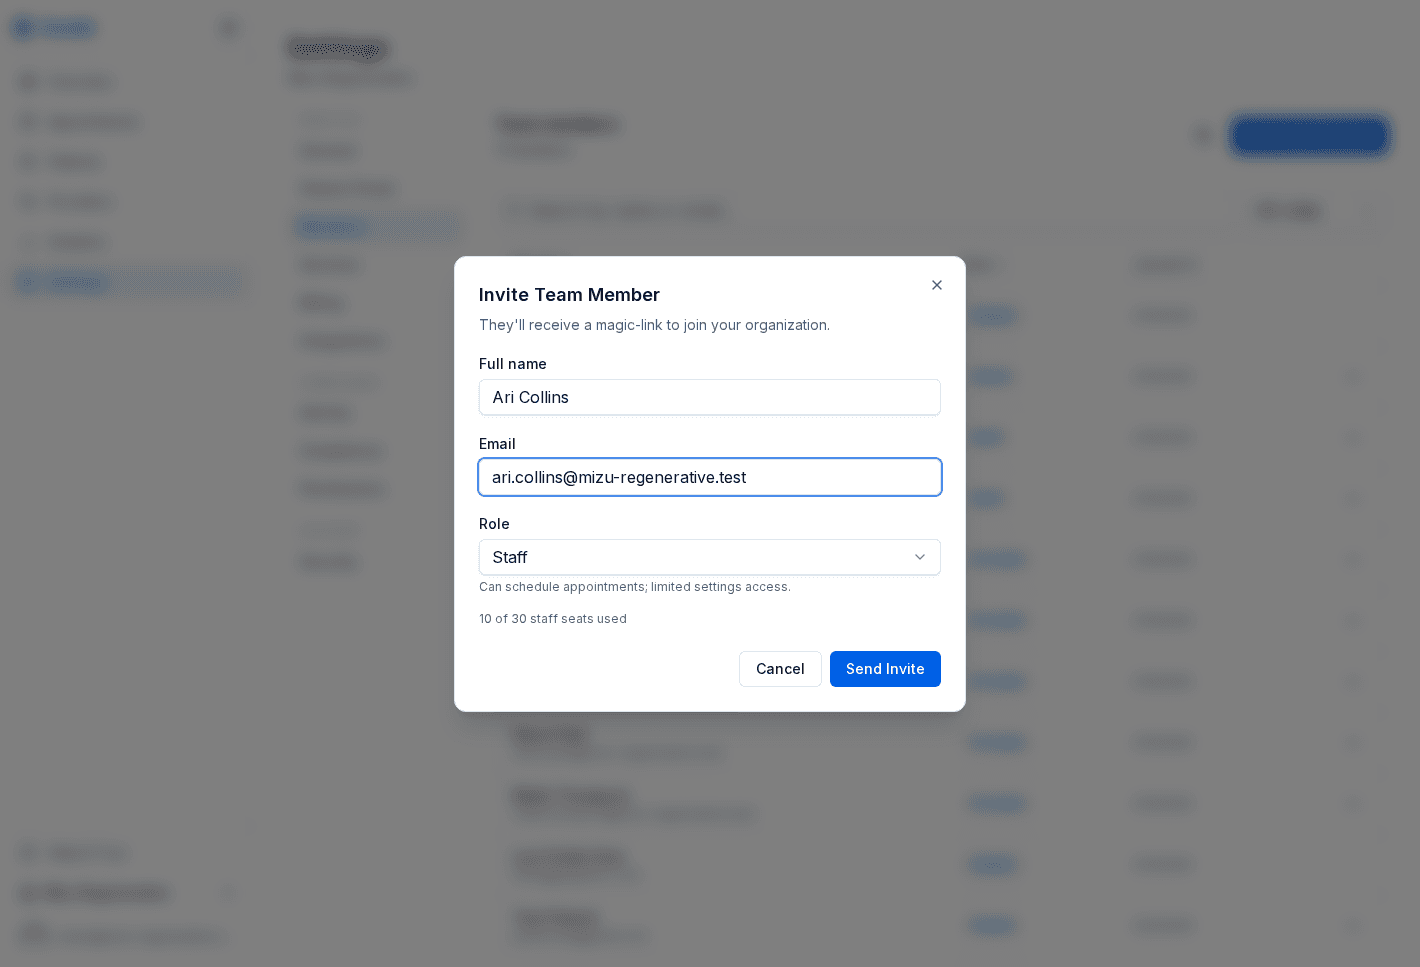
Inviting team members
Go to Settings → Members and click Invite Member. Enter their full name, email, and role. Here's how it works:
- An invitation email is sent to the team member's inbox with a magic link (no password needed)
- They click the link and gain immediate access to your practice
- Invites expire after 72 hours for security. You can review and revoke pending invites from the Members page.
- Team member limits are enforced per your plan (see Billing below)
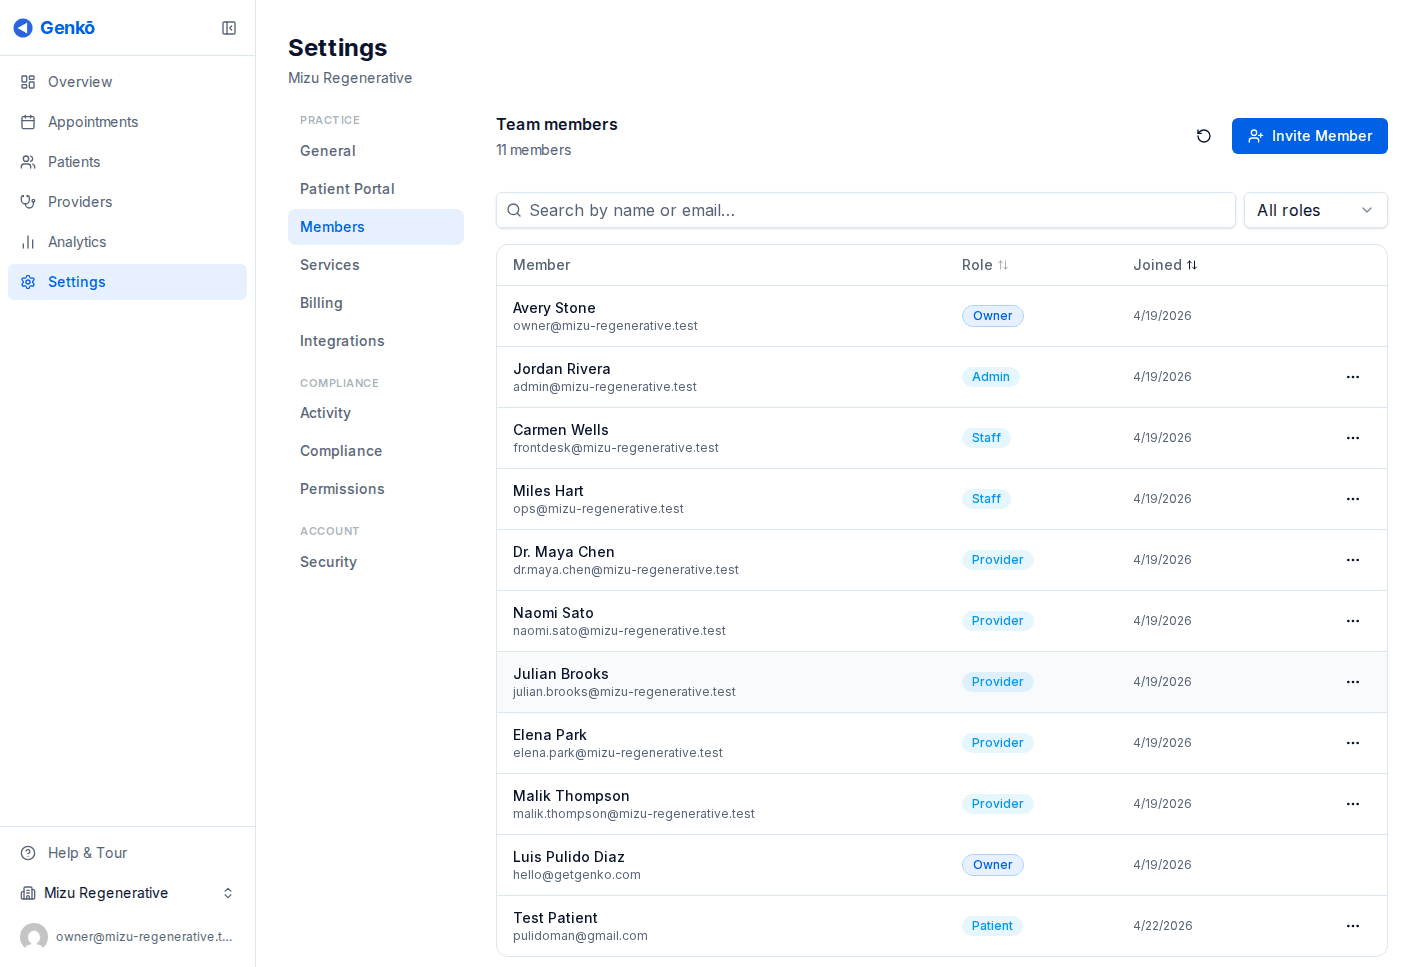
Roles & permissions
Genkō has four staff roles. Each role has different access levels:
- Owner — full access to everything, including billing, organization settings, and team management. Each organization has exactly one owner. Can transfer ownership or delete the organization.
- Admin — same access as owner except cannot transfer ownership, delete the organization, or access advanced compliance features. Good for practice managers. Admins may also be delegated permission management for RBAC if the owner allows it.
- Provider — can view and manage their own schedule and appointments. Can read patient records but cannot modify members, billing, or organizational settings. Good for clinicians who don't manage the practice.
- Staff — can manage appointments and read patient/provider information. Cannot modify members, billing, settings, or provider information. Good for schedulers and administrative assistants.
Team limits: Your plan includes a maximum number of staff members (excluding the owner). Owners and admins can change a member's role or remove them from the Members page at any time.
Permissions & RBAC
The Permissions page is where owners and delegated admins manage role-based access control (RBAC) for your practice.
- Role permission matrix — review and adjust what Admin, Provider, and Staff can do across Patients, Appointments, Providers, Services, and Settings.
- RBAC delegation — owners can delegate permission management to trusted admins without giving them full ownership rights.
- Granular controls — enable or restrict specific workflows like appointment deletion, patient export, and billing access.
Changes made on the Permissions page take effect immediately for active users. This helps you keep practice operations secure while still letting the right people move quickly.

Plans & Billing
Available plans
Genkō offers six tiers designed to grow with your practice. All plans include core features: appointment scheduling, conflict detection, email notifications, patient self-service portal, and provider availability management.
| Plan | Monthly | Yearly | Patients | Staff |
|---|---|---|---|---|
| Free | $0 | — | 100 | 3 |
| Solo | $29 | $290 | 250 | 4 |
| Starter | $49 | $490 | 500 | 6 |
| Group | $89 | $890 | 1,000 | 10 |
| Practice | $199 | $1,990 | 5,000 | 30 |
| Enterprise | $449 | $4,490 | Unlimited | Unlimited |
Advanced features unlock as you scale:
- Solo and above: Multiple services, appointment fees, Google Calendar sync, and Stripe payment collection
- Group and above: Analytics, WhatsApp messaging, and MCP API access
- Practice and above: Advanced scheduling rules, dashboard AI assistant, and AI-powered WhatsApp scheduling
- Enterprise: Custom integrations, dedicated support, and SLA guarantees
Upgrading or downgrading
Go to Settings → Billing to manage your plan:
- Upgrade: Click Upgrade Plan to move to a higher tier. Redirects to Stripe Checkout where you choose monthly or yearly billing. Takes effect immediately. Prorated charges apply if mid-cycle.
- Downgrade: Downgrades apply at the end of your current billing period, so you keep access until then. Make sure your usage will fit the new plan's limits (e.g. patient count).
- Billing interval: Switch between monthly and yearly at any time from the same page.
Billing portal
After subscribing, manage billing details through the Stripe billing portal accessible from Settings → Billing → Manage Subscription:
- Update your payment method
- View and download invoices and receipts
- Cancel your subscription (access continues until period end)
- View billing history and upcoming charges
Permissions: Only owners and admins can access billing settings. This protects your payment information while allowing authorized staff to view their role limitations.
Patient Portal
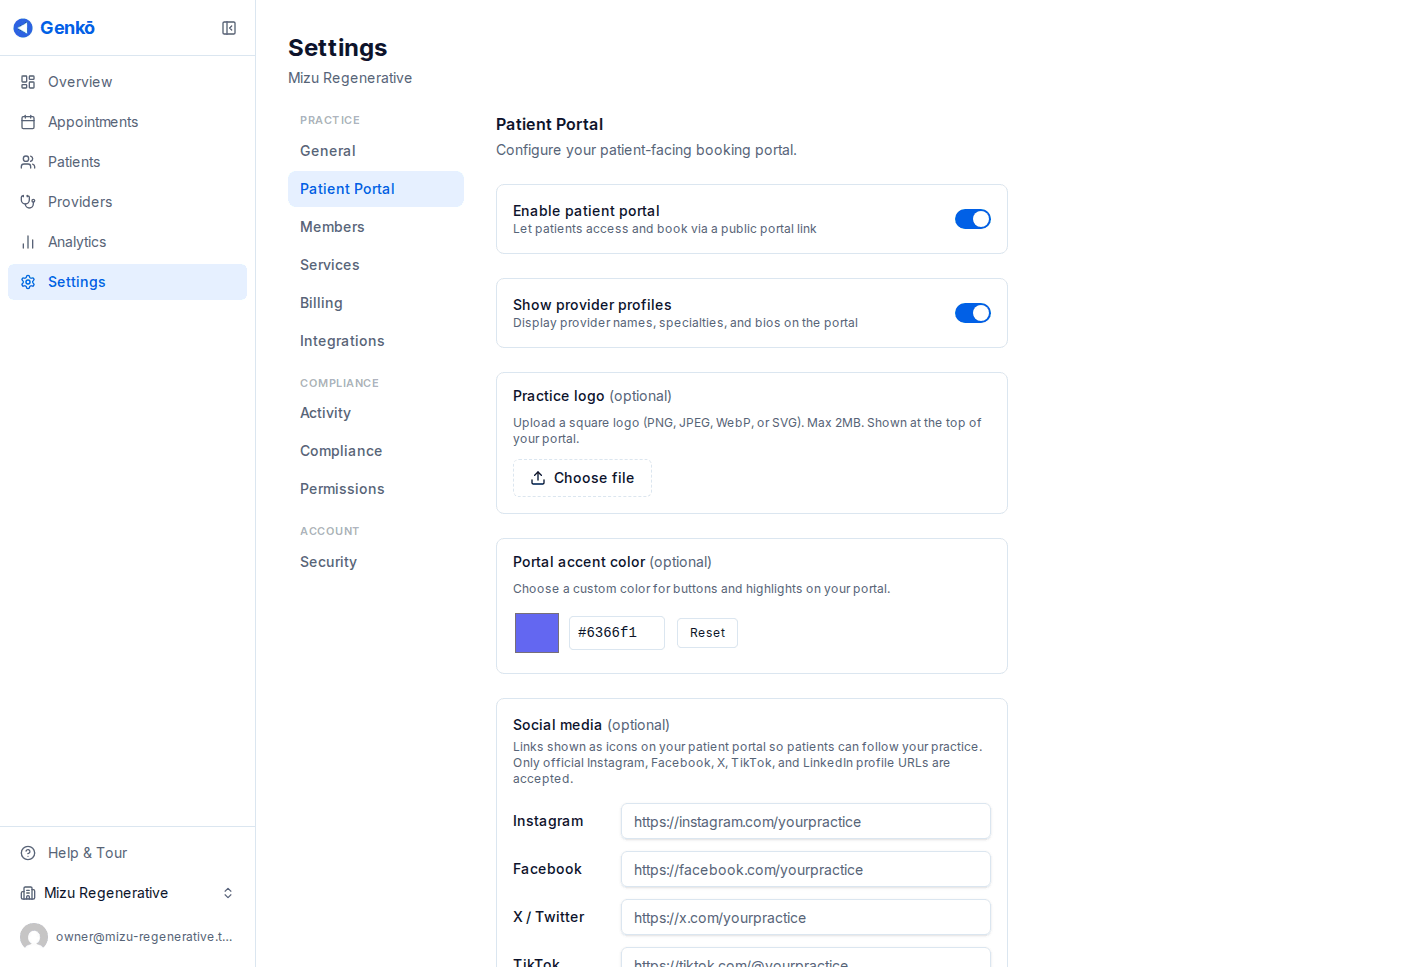
Enabling the portal
The patient portal lets patients self-book appointments without staff involvement, reducing administrative overhead and improving patient convenience.
To enable:
- Go to Settings → Portal
- Toggle Enable Patient Portal to on
- Your practice gets a unique public booking URL:
https://www.getgenko.com/portal/your-slug - Share this link with patients via email, website, appointment confirmations, or anywhere else
Patient self-booking
When patients visit your portal link, they follow a simple flow:
- Browse offerings: See available services with descriptions and providers with specialties/bios
- Select service & provider: Choose which service they want and who they prefer (or auto-assign)
- Pick date & time: Calendar shows only available slots based on provider availability and scheduling rules
- Enter contact info: First name, last name, email, phone. Account creation is not required.
- Confirmation: Patient receives an email with appointment details; booking appears in your calendar immediately
Smart matching: If the patient's email already exists in your database, the booking automatically links to their existing record. Otherwise, a new patient record is created.
Analytics & Insights
The Analytics dashboard gives you real-time visibility into your practice's performance. Track appointment patterns, provider productivity, no-show rates, patient growth, and more across any date range. All data is exportable to CSV or Excel for deeper analysis or integration with external reporting tools.
Dashboard overview
The Analytics page is located at Overview → Analytics (or directly from the quick-links in your dashboard). It displays seven key performance indicators at the top, followed by interactive breakdowns of your data.
Main section: Shows a preview of data for the selected date range. Click View full analytics to expand and see all available metrics and filters.
Date range and presets
Analytics support two ways to select a date range:
- Presets: Quick shortcuts for common periods — Today, Yesterday, Last 7 days, Last 30 days, Last 90 days, This month, Last month, This year
- Custom range: Pick any start and end date to compare specific periods (e.g., comparing two months or comparing performance before/after a process change)
The dashboard updates instantly when you change the date range.
Key performance indicators
The top section displays seven KPIs for your selected period:
- Total appointments: Count of all appointments in the period (including completed, no-shows, and cancelled)
- Completed appointments: Count of successfully completed visits
- No-shows: Count of appointments marked as no-show
- Cancelled appointments: Count of cancelled visits (by staff or patient)
- Completion rate: Percentage of total appointments that were completed (completed ÷ total)
- No-show rate: Percentage of total appointments that were no-shows (no-shows ÷ total)
- New patients: Count of new patient registrations in the period
Breakdowns and filters
Below the KPIs, you can view data broken down by:
- By day: A line chart showing appointment volume and completion rates for each day in the selected range
- By appointment type: See which services are most popular and their no-show rates
- By provider: Compare provider productivity, completion rates, and no-show rates
- By status: Breakdown of appointments by status (completed, no-show, cancelled, scheduled)
Each breakdown is interactive — click on a segment to drill down or filter the entire dashboard by that value.
Export data
All analytics data can be exported for external analysis, reporting, or integration:
- Click Export in the top right
- Choose format: CSV (opens in spreadsheets like Excel) or Excel (creates a downloadable .xlsx file)
- The file includes all KPIs and breakdown data for the selected period
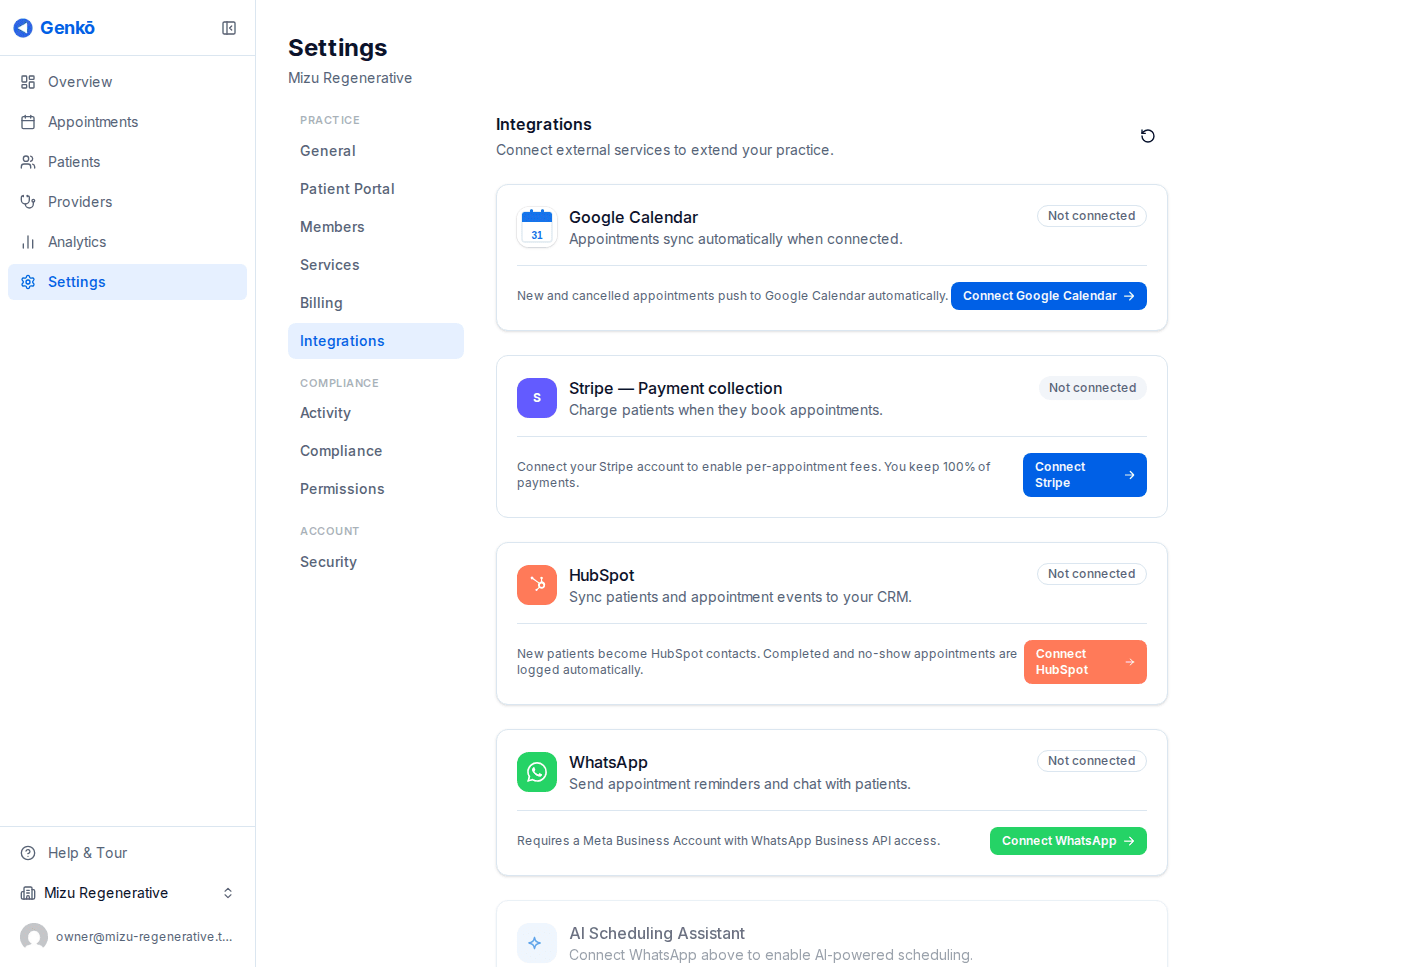
Integrations
Google Calendar sync
Genkō can sync appointments to Google Calendar so providers always have their schedule in sync, whether checking Genkō or Google Calendar. This reduces context switching and missed appointments.
How to connect:
- Go to Settings → Integrations
- Click Connect Google Calendar and sign in with the Google account you want to sync to
- Grant Genkō permission to create and modify events in your calendar
- Select which calendar to sync to (default is "Calendar")
- Click Confirm — sync begins immediately
What syncs: New appointments, updates (time/date changes), and cancellations sync in both directions:
- Appointments created in Genkō appear in Google Calendar within seconds
- Cancelled or rescheduled appointments update in Google Calendar
- Provider names, patient names, and appointment notes appear in the event details
Plan requirement: Google Calendar sync is available on the Solo plan and above.
Disconnect: You can disconnect the integration at any time from Settings → Integrations. Your past events in Google Calendar remain untouched.
API & AI (MCP)
What is the MCP API?
Genkō exposes a Model Context Protocol (MCP) server that lets external AI agents and tools read and write your practice data in a structured, tool-call format. This is the same underlying registry used by the built-in WhatsApp AI scheduler and the dashboard AI assistant — so any agent you connect gets access to the same capabilities.
The MCP endpoint is a stateless HTTP server compatible with any client that speaks the MCP Streamable HTTP transport (e.g. Claude Desktop, OpenAI Agents SDK, or any custom agent built with @modelcontextprotocol/sdk).
Quick start
1. Go to Settings → Integrations and scroll to the API Access (MCP) panel.
2. Click Add key, give the key a name (e.g. "Claude Desktop"), and choose a scope.
3. Copy the raw key shown immediately — it is only displayed once.
4. In your MCP client, set the server URL and the Authorization header:
# Claude Desktop — claude_desktop_config.json
{
  "mcpServers": {
    "genko": {
      "url": "https://www.getgenko.com/api/mcp",
      "headers": {
        "Authorization": "Bearer genko_YOUR_KEY_HERE"
      }
    }
  }
}Authentication
All requests to /api/mcp must include a valid API key as a Bearer token:
Authorization: Bearer genko_...
Keys are created in Settings → Integrations → API Access (MCP). Each key has a scope:
- Read — can call list/get tools only (Group plan)
- Read + Write — can also create and update records (Practice+ plan)
- Admin — full access including patient intake overrides (Enterprise)
Keys can be revoked at any time. Revocation is immediate — in-flight requests are not interrupted, but subsequent requests with the revoked key return 401 Unauthorized.
Available tools
The tools exposed depend on the scope of your API key. All tools operate on data scoped to your organization only.
Read tools (available on all scopes):
list_appointments— list upcoming appointments with optional date/status filtersget_appointment— fetch a single appointment by ID with full detailslist_patients— search patients by name or email (paginated)get_patient— fetch a single patient record by IDlist_providers— list all providers with their specialtiesget_provider— fetch a provider's profile and upcoming availabilitylist_appointment_types— list all appointment types (services) with durationscheck_availability— return open time slots for a provider within a date range
Write tools (read + write or admin scope, Practice+ required):
book_appointment— book a new appointment (conflict-checked)update_appointment— change the time, status, or notes of an existing appointment (conflict-checked)cancel_appointment— set an appointment to cancelled statusget_patient— fetch a single patient record by ID with full detailupdate_patient— update a patient's name, email, or phonefind_or_create_patient— look up by name/email, optionally auto-create if not found
book_appointment and update_appointment run server-side conflict checks. If the requested slot is already taken, the tool returns an error with the conflicting appointment details instead of double-booking.Clinical Records tools (write or admin scope, Practice+ required):
get_patient_record— fetch the full longitudinal record for a patient: every visit with its clinical notes and intake form in chronological orderlist_appointment_notes— list all clinical notes for an appointment (SOAP, progress, intake review, discharge)get_clinical_note— fetch a single clinical note by ID with full SOAP fields or free-form contentget_appointment_intake— fetch the pre-visit intake form submitted by a patient for an appointmentcreate_clinical_note— create a SOAP or free-form clinical note for an appointment; saves as draft by defaultupdate_clinical_note— update any field of a clinical note, or publish a draft by settingis_draft=false
Admin tools (admin scope, Enterprise+ required):
review_intake— approve or reject a patient intake submission; rejected submissions prompt the patient to revise before the visit
Rate limits
MCP API requests are rate-limited per key using a fixed 60-second window. The default limit is 100 requests per minute. If you exceed the limit, the server responds with:
HTTP 429 Too Many Requests
Retry-After: 60
Usage for each key (calls in the last 7 days) is visible in the Settings → Integrations panel next to each key name.
Dashboard AI assistant
Practice+ organizations can enable a built-in AI assistant directly in the dashboard. When enabled, a floating chat widget appears in the bottom-right corner of every dashboard page. Only org admins and owners can see and use it.
The assistant has full admin-scope tool access and can answer questions like:
- “Who is my next patient today?”
- “Find all appointments for Maria Santos this month”
- “What slots are available for Dr. Reyes on Friday?”
- “Update appointment #abc123 to 3pm”
To enable: Go to Settings → Integrations and toggle on Dashboard AI Assistant. The toggle is visible only on the Practice plan and above. No API key is required — the assistant uses your session automatically.
Account Security
Genkō supports two-factor authentication (2FA) to add a second layer of protection beyond your password or OAuth sign-in. You can enroll, manage, and remove authentication methods at any time from Settings → Security.
Authenticator App (TOTP)
Time-based one-time passwords (TOTP) work with any standards-compliant authenticator app — Google Authenticator, Microsoft Authenticator, 1Password, Authy, and others.
To set up:
- Go to Settings → Security and click + Add authenticator app.
- Scan the QR code with your app. If you can't scan, copy the manual setup key shown below the code.
- Enter the 6-digit code shown in your app and click Confirm setup.
To remove TOTP, click Remove next to the active authenticator. You can re-enroll at any time.
Passkeys (WebAuthn / FIDO2)
Passkeys let you sign in using your device's built-in authenticator — Face ID, Touch ID, Windows Hello, or a FIDO2 hardware key like a YubiKey. They are phishing-resistant: no shared secret leaves your device.
Passwordless sign-in: Once you have registered a passkey, you can sign in to Genkō without entering a password. On the login page, click Passkey and follow your device's prompts (Face ID, Touch ID, etc.). You don't even need to type your email if you've signed in on that device before.
Two-factor authentication (2FA): Passkeys also act as a powerful second factor. If you sign in with your email and password, and have a passkey registered, Genkō will prompt you for a passkey challenge to complete the sign-in. This ensures that even if your password is compromised, your account remains secure.
To register a passkey:
- Go to Settings → Security and optionally enter a nickname for the passkey (e.g. "MacBook Pro", "YubiKey").
- Click + Add passkey. Your browser will prompt for biometric confirmation or hardware key touch.
- Confirm — the passkey is registered immediately.
You can register multiple passkeys (one per device) and remove any of them individually. Passkeys are stored securely in your account and never transmitted.

Setup prompt after sign-up
After creating your practice, Genkō shows a one-time Secure your account prompt where you can enroll a TOTP app or a passkey before proceeding to the dashboard. This step is optional — you can skip it and set up 2FA later from Settings → Security.